Wednesday, July 31, 2013

WOYWW, for the second week


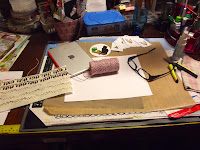
Here is what I am presently working on.  Might not look like much but it's a bit hush hush for now.  There will be a big reveal August 9 over at the Get Inky! blog.  I am on the design team there and we have been playing with some new stamps, let's just say they can be spooky!  I don't know if you noticed but my studio work desk seems to have grown since last week.  Well, it has and it hasn't.  You see I spent a greater part of last sunday moving furniture around in my studio because I was not finding my work space efficient.  I moved my drawing desk from the back of the room to be beside my work desk and repositioned most of my drawing and colouring tools.  I now have easier access to my stamps due to this move.  I hope this works out for me.  However, there is still something missing including better lighting.

I enjoy being a part of this WOYWW group, but I have to admit that my time is restricted and I wasn't able to visit everybody's post last week, sorry. :(  There quite a few of us doing this and I am so curious ,I love looking at what everyone is doing it is a good way to be inspired and to procrastinate.  :) 

Thanks for stopping by.

Sunday, July 28, 2013

Christmas in July?

Yes, over at the Get Inky! stamps blog we have been affected by the heat wave and we are busy creating Christmas and Holidays theme projects to show off the newly released stamps: Holidays 2013 by Get Inky! for Blue Moon Creation.  There is also a challenge going on and as usual some lovely prizes.


Here is a sampling of my work:

                                                                        The card folded:


                                         My work desk with washi tape and tags in progress:


The card open.


Materials used to make the Accordion Zig Zag Merry Christmas card:
Cardstock:  Staples, American Crafts, Michaels
Copics: E37, YG09, R27, YG03, ), Y08, BG07
Glitter marker in red : Laurentien
3 D Crystal Lacquer: Sakura
Liquid Applique: Marvy
Glue:  Aleene's
Stamps:  Get Inky! for Blue moon creation (Holidays 2013)

I would appreciate any comments, please click on the "comments" below (sometimes it is finicky but it is there).  And also subscribe to follow my blog, please, boxes are in the side bars.

I hope you enjoy!  Thanks for viewing.


Friday, July 26, 2013

Fake It Friday# 4: How to Score big and spend little.

Ha ha.  Catchy title huh?  Don't worry this is not a post about sports or dating.  I am explaining today on Fake It Fridays # 4: How to score your paper crafts even if you do not own one of those fancy dandy score board systems.  By the way, scoring paper refers to the act of creating a fold line on paper prior to folding it.  Why do we do this?  Because it assures a straighter fold and a crisper one as well.  It is not necessary to do this all the time but if you are selling or publishing your work, neatness will count.


Ok, so let's be honest, I do own some special scoring boards and tools and I do like them a lot, but not too long ago I did not have any at all.  I saved my money, had a coupon, waited for a sale and purchased one.  Then a week or so later I went to an event and I won another one!  Of course!  So now one is in my crop bag all ready to go, and the other is in my studio.  Until that fruitful week I simply used a metal ruler and my paper trimmer.  Most of those paper trimmers whether they use a rotary blade or a knife type blade have the blade pass through a channel.  I learned to use that space as my scoring board.  I learned this from watching another lady at a crop, and at that moment I smacked my forehead and thought why hadn't I thought of that before!


Now, I warn you, using the paper trimmer channel method is risky.  First of all, remember not to slice your paper with the blade.  Secondly, use a gentle pressure when sliding a bone folder, a ruler, a plastic card or whatever along the desired fold so as not to tear through the paper.  Thirdly, that is it.  Note, the paper trimmers generally have grids or lines on them, use these to help line up your projects.  Also, many types of trimmers come with the option of swapping out the blade part for a non cutting blade made for scoring.


What if you don't own one of these paper trimmers and you are concerned about making crisp folds?  Use a ruler and a grid like surface.  Your grid can be a non slip craft mat or even a sheet of graph paper taped down to the table.  Line up your ruler and mark your fold.  Use just about any thing with a strong straight edge to score the line.  A spoon will work, if you use the handle to score and the spoon part to crease.


I hope that this is a helpful tip for someone.  Please leave a comment if you wish, there is a place down there that should say comments, sometimes it is hiding, but it is there.  Also, I d love to have you subscribe or follow my blog, you can join in one of the boxes on either side.
Thanks for viewing.

Wednesday, July 24, 2013

Thursday Tip

Today I just wanted to update those of you who are interested in my experiment with the LePage Super Gel Glue. Well, I really like it.  I find it is so easy to use with its really cool squeeze bottle that can stay upright on my work desk .  I find that this new design makes it less likely to waste.  I find the nozzle flows well and didn't clog.  I used it primarily to repair items around my house, and also some crafting tools.  I did use it to glue some heavier embellishments on some of my creative projects.  However I do not recommend using this glue with photographs, or archival sensitive and light papers.
        

WOYWW First Time!

Hey, Im doing a WOYWW for the first time!  It's a post about What's On Your Workdesk Wednesday!  How fun is that?  I saw this on the net and thought why not! It might be fun and a way to encourage me to get my creative mojo moving.  So here goes nothing....


Ooooh!  Nah.  I know, dark and depressingly boring today.  What's on my desk this Wednesday?  Well this is my office desk where a lot of planning ,scheduling, writing and downloading pictures happens.  I prefer to work creatively in my studio/craft cave but a woman's  got to  do what a woman's gotta do.  Today I have spent a lot of time scheduling and planning my assignments for the Design Teams I am on, for the rest of the year.  Soon, unfortunately, summer will end and the homeschool routine will begin.  So I need to prepare myself.  My priority is my family after all.  I also spent some time making labels for my new sets of clear polymer stamps so I can better remember what sets and stamps I used in my projects when it comes to publication time, viewers want to know which and what product was used.  So that is why you see my paper agenda there and a roll of labels.  My desk planner has notes and scribbles on it too with reminders of personal things and a SALE tomorrow at one of my fav. fabric stores!!!  Very Important item.  The pile of cartridges on top of my Cricut were used last week for projects.  There are a bunch of papers waiting to be filed and others to be read.  There is a bottle of glue to remind me about posting my product review for the company.  I have several post it sticky note pads cause I LOVE them and use them every day.  There are a whole bunch of boring office tools and supplies too, because I need them.  The phone is there since no one else seems to hear it ring in my house!  There is a binder with my Art Recipes, at least that is organized. I was forgetting the obvious, my computer!  Duh!  And that is pretty much it.  Next picture below I will show you what my main work desk in my craftier area looks like.


Now this is a bit better.  I show off my messy but happy desk.  I have been making christmas theme projects lately and these are not quite done.  I have been stamping and colouring and glueing on beads, attaching twine, etc.  There's my mini iPad that I use to take photos as I work (theses pictures were taken with my Fuji Camera since I keep it closer to the work work desk.  There's another pair of reading glasses, (I have several all over the house), my most used tools, a scrap bin, my acrylic blocks, baby wipes (I use those constantly as well as a rag), some other little bins that hold bits of scrap ribbons and papers, and another just for all the confetti I tend to make from projects.    So that is that.  I hope you enjoyed.  Thanks for viewing.

Sunday, July 21, 2013

Summer, Sun and Fun...


Welcome to the Surf, Sun, & Stickles Blog Hop brought to you by the All that Stickles design team!


We're in the midst of a heat wave and what better way to cool off then indoors crafting with some Stickles?! This month's hop is all about using Stickles on those fun, summer-themed projects we all love to create. 
For my project I made this Doll Tag.


Here is the list of products and tools I used:
Paper; White card stock (tag base) from Staples, 12 x 12 Beach theme paper and frame from Dollarama, doll is stamped on telephone directory page, other papers are scraps from my stash.
Stickles by Ranger; Yellow (sun, and belt on doll), Orange Peel (sun), Frayed burlap and Antique Linen (sand), Silver Ice (crown), Pink (dress and shoes).
Stamps;  Doll Stamp #910167 by Prima Marketing, and Sun Stamp from Sailboat Collection  by Get Inky! for Blue Moon Creations.
Die Cuts; Cricut and Cricut Cartridge Life is a Beach.
Ribbons and Trims; Blue mesh (Dollarama), Top of tag ribbon with Seashells (Michaels), Yellow pom pom (Stampin' Up!), and Pink pom pom (Michaels).
Inks; Doll stamp image (Memento), Distress Inks by Ranger in Tattered Rose, Pumice Stone, and Tea Dye.
Colouring pencils; Prismacolour, Laurentien, and Lyra Metallics.
Adhesives; Elmer's clear glue, Aleene's Tacky Glue, and Dimensional foam dots.
Staples; Fastenator by EK Success.
Doll's hair= Brown Flock (Three Bugs)

We have blog candy for those who are a follower of All that Stickles and leave a comment on every stop of the hop! Winners will be announced Wednesday July 24th at All that Stickles.

Winner's Choice of a Cricut or Cameo cover

$15 Gift Certificate

$6 Voucher

10 Digis of Winner's Choice

5 Digis of Winner's Choice

Your next stop is __HERE!  Congrats if you made it here, if not check below to see who you might have missed. 

Here's the complete lineup:
Chas
Julie
Karen
Cathy
Ann

To leave a comment on my blog look below and click on the #comments,  And sign up to follow this blog by entering your email in the Google box in the left bar or in the Networked Blog box in the upper right bar.

Thanks for hopping! :) Don't forget to check out our Waterfall Linky Party!

Saturday, July 20, 2013

Doll Tag


Hello everyone.  The All That Stickles Design Team has a nifty Linky Party going on right now and the Theme is Waterfall Stickles.  It is such a pretty shade of blue.  After you are done here please go check it out.
For my sample I made this Tag using my newly acquired, and loved, Doll stamp by Prima (#910143).  She is a tall one at nearly 7".  I made the background tag from two layers of card stock which I covered with a patterned paper by The Robin's Nest.  I used the packaging that the stamp came with as a template.   I used ALOT of tools to make this lil' beauty, and it was so much fun.

I already mentioned that I used The Robin's Nest paper as the background, I also used papers from the same line for most of the project, and the faux gems are RN as well.

I stamped the doll onto a lightly and lovely printed Robin's Nest paper, I used Memento black ink.  I stamped the doll again on some brown card stock (from my stash), a piece of tan card stock (also from my stash), and I stamped the doll again onto a piece of Robin's Nest printed paper.  By the way the RN paper is a nice card stock thickness.  There was a lot of fussy cutting and paper piecing with dimensional foam adhesive to make her 3D.  The top of her dress is enhanced with a pink Flocking powder, and her head band was glittered with pink glitter by Martha Stewart.  Note that all the edges of the doll and the other die cuts were inked with Ranger's Tim Holtz Distress inks (Black soot, and Tattered Roses).  The edges and lines of the doll were also defined with black permanent ink marker (Staples).  I used a white Gel ink pen to high light her shoes.

Although the stamp is of a faceless doll I made her some eyes with Waterfall Stickles.  I also used the same colour of Stickles as the centres of the flowers and as a shimmery background to the doll's upper background.   My use of Waterfall was subtle but I think effective.

I adorned the tag with smaller tags which I made from scraps of the same papers I had used thus far.  I used a variety of die cutters, punches and shape makers:  Stampin' Up! Tags and Label makers; and Creative Memories Tag Maker.  The doily type circle was made with a Fiskars lace punch.  The button border strip was made using an EK success punch.  The small flowers were made from Fiskars punches.

To decorate the tags I used sewing theme stamps from my stash( Creative Life ), embroidery threads and small eyelets (also from my stash) as well as my Crop-a-dile to do the work of making holes and attaching hardware.  The larger tags holes were made by using  a Stampin' Up! 1/4" circle maker and a scrap piece of Robin's Nest paper, glued to the tag and pierced with the Crop-a-dile.


I hope that you enjoyed this posting. Please leave me a comment below and join my followers in the sidebar.  thanks for viewing.
Our July sponsors at All That Stickles:
Sponsors
Freckled Fawn
http://freckledfawn.com
Prize - TBD
My Craft Spot
Prize - TBD
Robin's Nest
http://www.robinsnestscrap.com- Variety of Dew Drops
Fresh Brewed Designs
Prize - 5 dig-is

Friday, July 19, 2013

Fake It Fridays #03, Make Your Own Stamps from Foam

Hi.  today is installment # 3 of the Fake It Fridays posts.  I hope that you are enjoying this series so far.  Today I am going to show you how to add to your collection of stamps for mere pennies (or nickels if you are in Canada). :) 

First you will need to gather up some fun foam, this stuff is sold in sheets and is usually very affordable, it can be found in Dollar stores, Walmart, and Michael's to name just a few.  It is a great material for kids crafts, and it is also used in many many adult crafts as well.  

You also need to gather some of your favourite dies to cut out your stamps.  I have used metal dies such as Sizzix, Cuttlebug, and Spellbinders.  Of course this also requires the use of a die cutting system.
You will also need scissors, glue and a base to glue on your stamps (especially the bigger ones),  I often use inexpensive plastic rulers that I have purchased at the Dollar store.

I like to first cut a strip of foam to fit the ruler so as to add some height to my stamp.  I then glue that strip to the ruler.  Following the instructions for the die cut system you use cut another piece of foam with a die.  It is possible that you will need to run the "sandwich" through the system more than once.

  When you have the die cut from foam, adhere it to the foam backed ruler.  That is it.  This way you now have a matching stamp to your favourite die cut.  Now ink away and stamp like any regular stamp.


I sometimes glue larger pieces of foam as handles on the back side of my ruler stamps. it makes it easier to lift up a stamp after stamping.

I use inexpensive plastic rulers as bases for my border stamps.

For smaller stamps I like to use empty CD cases or plastic bottle caps, even lids to mount my homemade stamps.  I have also used Aleene's Tack it Over and Over glue to just keep my foam stamps flat in page protectors until I need them and then stick them to a regular stamp block when I am ready to stamp.
Another fun and inexpensive thing to do is to use those already cut foam shapes ava.ilable in dollar stores and craft stores as stamps.

I hope you enjoyed this post.  Please leave me some comments below, and join the group of followers in the side bar to keep up with my other ideas.  thanks for viewing.

Friday, July 12, 2013

Fake it Fridays, # 2, Stamp Storage.

Hi, last week I explained my techniques and recipes for homemade stamp cleaning solutions.  Today I am showing you how I made my own fancy dandy flat stamp storage system for just a few dollars.  Now, I love all those pretty scrapbook storage systems that are sold out there, but sometimes they are either a little out of my budget or I just can not get hold of one where I am, so I come up with alternatives.

Here is my homemade version of a spinning rack storage system.


To make this I purchased a paper towel holder, three very large binder rings and ALOT of page protectors.  I used paper and card stock I had on hand to put inside each page protector to make them sturdier.  I then inserted my collection of flat rubber and clear stamps in the pages, I also used some binder page divider pages to separate into categories:  Flowers, Shapes, Holidays, etc.  There are hundreds of pages and this system could handle more.  I sit it on a flat surface and If I need to move it I do so with two hands and carry the system by the bar like a handle. This way no pages fall off or get damaged.

This system works very well to hold just papers, embellishments, sewing patterns, and so many other things.  I used to keep my stamps in binders in the same plastic pages, but I soon ran out of binders and space.  This system actually takes up less room than my previous collection of binders.  It is also quicker to access.

I hope that you enjoyed this post and let me know your comments below,  Also, if you have any ideas or suggestions as to what other Fake it Friday posts you might like to read, let me know.  Thanks for viewing.

Monday, July 8, 2013

Summer, Sun and Fun!

It is Summer and time to have Fun!  For this week's challenge over at the Get Inky! blog, I came up with this:


It is a foam can cooler that I stamped on.  I used the Delightful jars stamp set by Get Inky!, some staz on ink and some sharpies to get a permanent image onto the foam.  I also made a little flag for the paper straw using the lemon from the same set.  It is surprisingly simple to stamp onto the foam with clear stamps.  Because the jar stamp is so big I used it non mounted and just rolled it onto the foam and pressed firmly.

For more ideas check out the blog and give the challenge a try, there are some nice prizes.  Now go Get Inky!

Thanks for viewing.

ps. I love comments and getting new followers, so please comment below and sign up in the side bars

linked to:
http://www.craftindesertdivas.com

Saturday, July 6, 2013

Accordion File Folder


Hi, the Linky Party is up and running over at the All that stickles blog and the Design team has made some cool projects with the Stickles of the challenge:  True Blue!

Here is my project:


I made an accordion file folder out of a pretty already made folder that I bought at the Dollar store.  The focal image on the front cover is; Akilah a mermaid digi from Fresh Brewed Designs.  I coloured her with a combination of Copic markers and a variety of coloured pencils.  Of course I added sparkle to her tea cup with True Blue Stickles by Ranger!  There are also some more glittery goodness around the edges of the folder and on the inside embellishments.


In addition to the file folder I used card stock and printed scrapbook paper to make the cover , the inserts, and the labels.


The inserts above were made from scrapbook paper from the Dollar store, I just tore these with a ruler, purposely leaving the edges raw and distressed.  The tabs and labels were made from a variety of blue card stock and my punches (Creative Memorie, Stampin' Up!, and EK Success).  The ribbon is also from the Dollar store.


These are the packages of designer file folders I found at Dollarama, each package has three different colours and designs.  I will have lots of folders for many projects.


To make the accordion folds I found it much easier to use a bone folder and my scoring board (Martha Stewart), although a butter knife and the edge of a table would work also.  In the above picture I demonstrate some of the tools and supplies I used.


I scored and folded the bottom of the folder at about four inches to make the pockets.


I used double sided tape, which is also sold at the Dollar store.  Note that despite what you see in this picture I ended up not adhering the ribbon along the entire back of the folder.  Instead I stuck the ribbon on the two end pieces to be able to tie the folder closed.

Some of the colouring tools I used on the mermaid.

I hope that this gives you some inspiration for your own projects.  I enjoyed making this and I hope you enjoyed viewing.  Please leave a comment below, and sign up to follow me in the side bars.  Don't forget you can take part in the challenge too!  
Thanks for stopping by.


The July sponsors and gifts at All that Stickles:


Friday, July 5, 2013

Fake it Fridays. #1 Stamp Cleaners


Hi, today is the first post in the series;
"Fake It Fridays".  I hope to bring you, my viewers, many interesting, time and money saving tips and ideas.  I am calling it "Fake It Fridays" because for one it is a catchy title, and two, because these posts will be about ways to make your own tools or supplies instead of feeling like you can't get ahead in your project because you don't have the latest product in your studio/craft area.
 Before we begin I want to make it clear that I have no intention on dissing any brand names or companies that make and sell similar products.  My goal is to help out those who want to do things a little differently either because they do not have access to, or the resources to get the commercial brand.  I started making art and crafting from a very young age, and we lived up and out in the woods, far far away from any towns or cities without full retail access, so we often had to make our own, and make do!  My resources and access have definitely improved since those years but I know that is not the case for many of you.  Plus, I love the DIY trend!

For the first post I am presenting you with my recipes for DIY stamp cleaning.  I like to take care of my rubber and clear stamps.  I want them to be ready to go for the next project and I want them to last, so I clean them.  Usually when I stamp I have a pad of news print that I stamp off as much ink after I am done stamping  images onto my project.  I also stamp off one or more images from my dirty stamps onto an art journal page for a future background.  Now, I like to spray some stamp cleaner onto a mat that has a pile texture like a paint pad or a cleaning pad.  I rub the stamp onto the damp pad and then I rub the stamp onto another similar but dry cleaning pad.  I let the stamp air dry before I put it back in its designated storage space.

I like to use my homemade cleaning solutions especially after using pigment inks.  I also have a homemade cleaning solution for regular or dye inks.

The third cleaner I use is plain water in a spray bottle.  I find that the spray helps dislodge any ink left in those detailed stamps quite well.  The fourth method I use is the good old baby or hand wipes!  I always carry a pack of those to crops and classes, they are so convenient.

The other reason I like to use my homemade spray cleaners is that they condition my stamps and keep them from drying out and cracking.

Here are my recipes (please note, that these recipes were given to me by other crafty people a long time ago and I have tweaked them to my liking).

Regular Stamp Cleaner:  In a bottle (preferably recycled) the size of a regular shampoo or hand dish washing detergent I pour 1 part soap (either an inexpensive dish soap or baby wash, something gentle), 1 part glycerin, 1 part alcohol (rubbing kind preferably the 99%, but another will work), and fill the rest of the bottle with clean water.  Mix to get a watery consistency, add more water if it is too thick.  Next, pour into smaller spray bottles (I recycle travel size body spray and hair spray bottles).

Staz On Cleaner:  Almost the same recipe as the regular cleaner with the exception of replacing the glycerin with Mineral Oil.


Note:  the Glycerin, Alcohol, and Mineral Oil can usually be found at your local pharmacy/drugstore.  You will not use a lot of each but the total cost will be less than if you did buy these cleaners commercially.  In addition you can use these products for other household cleaning and crafting recipes.

Now for the cleaning pads.  In the picture above I show the stamp cleaning pad I have had for years, I had this when I was a S.U. demonstrator.  But I have also made my own version using an empty travel size (recycled) baby wipes container and rough kitchen cleaning pads from the Dollar Store.  I also find that the fluffier yet stiff paint pads (they are usually sold with a red rectangular handle, intended for painting around window trims) sold at the same store work very well.  I glue two pads, one in each cover, and spray cleaner on one side and use the other side to dry my stamps.


I hope that you enjoyed this post and find this new series useful.  I would love to know what you think.  Please leave me a comment(below), and join my list to follow my blog(side bar).

Thanks for viewing.

Tuesday, July 2, 2013

Vintage Roses Tutorial


I made this tutorial for the All That Stickles Design Team over at the blog, go check it out.


Monday, July 1, 2013

Happy 146th Birthday, CANADA!


Digital image from Bugaboo Designs.  Copic markers. Christmas Red Stickles. Creative Memories Maple Leaf punch.  Staples white card stock. Dollarama red card stock.