Learn to DIY original Holiday gift packaging and accessories by using a variety of materials with the Cricut Maker™. Make clear plastic gift boxes for treats, or make your trims and bows from felts and fabrics. Make gift tags from chipboard and paper. Also, identify gifts to and from with vinyl lettering! Make this a Handmade Holiday with some supplies with Cricut and the Cricut Maker™.
For example above check out the gift bog/boxes with tags that you too can make. To make this I used one design and a variety of materials with the Cricut Maker™ and the Adaptive Tool System that is unique in the die cutting industry, plus the Cricut Maker™ cuts the most materials.
The design is; "DIY Gift Bags with Lia Griffith-Creativebug" found in the easy to learn Cricut Design Space™.
To create the folds or score lines, I used the Scoring Rotary Tool in the Cricut Maker™. Using the Scoring Wheel will make each fold sharp, crisp, and to the point!
When cutting felt I use the Strong Grip Mat which is a Lilac or Lavender colour. A tip I have is to use the Brayer to make sure the felt has fully adhered to the mat.
To cut the cardstock, scrapbook paper, and acetate I used the Fine Point Blade.
For the felt, I chose the Rotary Blade although the fine point blade is also suitable.
After cutting the materials I assembled the bags using adhesives to hold them together. I chose to mix some of the materials within the bags to add interest.
To create handles I used some ribbons and slipped them through the holes that were already part of the design.
To complete the bags I used some colourful Christmas themed stickers from my stash.
How to shop for the crafter in your life, even if you are not familiar with their hobby. Here, is my top 10 list of tools that I already own and use almost on a daily basis in my work as a professional crafter. I use and love these tools, and I consider these must-haves in any serious crafter's toolkit
The following contains affiliate links that compensate me with a small commission, however, I personally do work with these products and highly recommend them. I purchased most of these products (6/10) with my own money.
Number #1 is a GLUE GUN! My absolute favourite is the Adtech Glue Gun with Precision tip! I love the precision and the fact that it can stand on its base. I also own a cordless model which I find invaluable in my studio.
#2. White Gel Pens!!! We art journalers, mixed media artists, scrapbookers, card makers, etc. love to use these and we never have enough!
#3. Tape Runner, or Double Sided Adhesive! The best way to add dry adhesive to your paper crafts, great for the batch making of scrapbook pages and more.
#4. Paper Trimmer. An indispensable tool for the paper crafter. Every scrapbooker, card maker, and paper crafter seeks precise cutting, and a trimmer is an answer.
#5. A Heat tool for the card maker! Elevate the card maker and mixed media artists skills with this much-loved tool.
Gentle air flow keeps your powders in place
Quiet, ergonomic, quick and safe
Great for curing embossing powders, shrinking plastic and tubing, quick-drying inks, glues and paints and for all your craft heating needs
#6. A Crop A Dile. No, it doesn't bite! LOL. It's a tool that we use for more than crafts in our house as it makes holes in thick leather, chipboards, metals, and more.
INCREDIBLE REACH: What sets this tool apart from the rest is its six-inch reach, that allows you to easily extend to the center of a 12 x 12 page.
ALL-IN-ONE TOOL: Punches clean holes at 1/8 and 3/16 of an inch. Setting apparatus allows you to quickly lock an embellishment into place. Adjustable measuring guide helps get the perfect measurement every time. Rotating setting cube won’t have you fumbling around for loose pieces.
#7. Cricut Maker. It cuts and writes like a dream!
Cricut Maker gives you the freedom to make everything from paper crafts, iron on's, and vinyl decals to sewing projects, leather crafts, and balsa models.
#8. Bright Pad.
For the artist and crafter to enhance their drawing.
#9. Die Cutting Machine (manual).
Cuts and embosses a variety of materials including tissue paper, foils, acetate ribbon, and thin leather
Works with other leading embossing folders and cutting dies
#10. Colouring Pencils. These are my favourite. The Faber Castell Polychromos Artist Quality.
Ok, just for some laughs....
NOT for the crafter but for the crafter's cat! LOL.
Today I answer 5 of the most FAQ 's (frequently asked questions) about the Cricut Maker™by people like you! It's no news to my readers that I am a HUGE fan of anything Cricut since like forever. I bought the very first, the one and only, the original Cricut way back when it came to market, and yes, I still have it! I have stayed loyal to the bug through thick and thin (no pun intended), and even after all its changes I still love it. **Sponsored Post**
Today I am delighted to say that I have the latest machine, the Maker™, and all of its accessories. There are many beautiful things to make with the Maker™, and I see the possibilities as almost endless.
For those of you on the fence as to whether you should take the plunge and invest into such an investment let me help you out by answering some frequently asked questions.
Will I use the machine enough to justify the price?
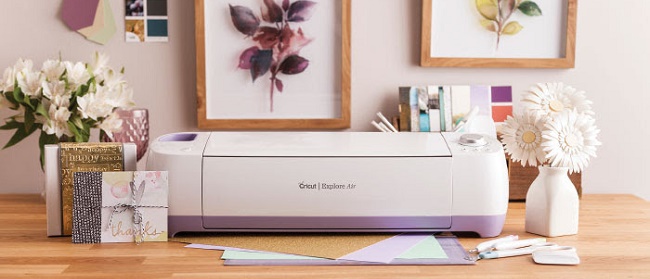
That depends on what you intend to make with it, what type of maker you are, and what your expectations are. In short, I would say that if you are the type of casual crafter who dabbles once in a while in paper crafting like card making and scrapbooking, the Maker™ is overkill for you. Stick to the Explore Air, that will do plenty to meet your needs.
The Maker™, with the right accessories, does way more than just cut, and score paper. It cuts fabric, and so does the Explore Air. However, you have the option of cutting fabric with a Rotary blade on the Maker which you do not get with any other model by Cricut.
With the Maker™, it is possible to use the scoring wheel accessory which works on a multitude of materials. However, keep in mind that you can also use the scoring stylus with the Explore Air with simple scoring. The difference being that with the Maker™ you have the option of using a double wheel scoring system (Sold separately).
So far I 've touched on some of the similarities between the Maker™ and its predecessor, the Explore Air and Explore Air 2. Now for the good stuff, the creme de la creme of what makes the Maker™ stand out on its own, and that you need to think about it that is something you want to work with.
What separates the Maker™ from ALL the other Cricut models to date is its Adaptive Tool System™! "The professional cutting technology intelligently controls the direction of the blade and the cut pressure to match the material, enabling the Rotary Blade to cut fabrics and the Knife Blade to cut thicker materials. With up to 10 times more cutting power than any other machine in its class, and an expandable suite of tools..." That means that the Maker™ has a different system that allows it to work with more tools to cut more materials, and that these additional tools can not be used in any cricut model made before. It's like a souped-up car with all the extras!
Now the question you need to ask yourself is whether you will be using the Maker™ to cut thin woods, thick cardboards and chipboards at any time? What about metals like aluminum, thin copper sheets?
Note that to a certain extent it is possible to cut certain chipboards, and thin materials with a Deep cut blade on an Explore model (by using the multi-cut feature ALOT) it will not be with the same speed and accuracy.
Are you interested in investing in the Maker™ for its usefulness in the sewing room? Are you a serious sewer? If yes, you may want to consider the Maker™ for its Adaptive Tool System™ and the rotary blade, because of the precision it provides. Personally, I do enjoy cutting felts, fabrics, canvas, denim, and other materials much more with the Rotary blade. But I have been sewing since I was young and I definitely see the potential in this machine to make my sewing experience so much better. In fact, I wrote a whole article on this on another site. (Check it out here)
However, truth be told, you can cut fabrics with other Cricut models, but not with the same speed and efficiency. With the Maker™ Rotary blade you will not need any backer material!
What Materials Can I cut? The Maker™ and its tools can cut hundreds of materials! I know and have seen it cut vinyl of every type even the glittery ones! It cuts leather, felt, denim, chipboard, cotton, iron on materials, aluminum cans, balsa wood, etc. It cuts from thin, slippery fabrics to corrugated cardboard, and fleece. I know its limits are always being tested. You can check out everything that it can cut that the Cricut Team knows of to this point at cricut.com/materials.
I think the list of what it shouldn't or can't cut is much shorter! Like glass, and food items. LOL.
Can I use my Old Cartridges? Yes! Although there is no place to insert the old cartridges on the Maker™ all you need to do is to link your cartridges to your account through Cricut Design Space™, OR by using your Explore Machine or the Cricut Cartridge Adapter (currently not available). Which allows you to use your cartridge's content. Note, do not put the adapter into the Maker™ USB port!
Can I upload my Own Images? Yes! It is possible to use your own images. Any image whether it is a flat jpeg or a multi-layer vector file can be uploaded to Cricut Design Space™, and it will automatically process your image so you can print, cut. Emboss etc. to your heart's content. Create any project you imagine!
All you need to do is have your image ready, go to Cricut Design Space™, upload your image, and design your own unique project!
What Kind of DIY Projects Can I Make?
Anything you want! Whether you are interested in making papercrafts such as a card to give to someone or to make embellishments for a special scrapbook page layout to sewing a quilt for a baby, and creating some 3 Dimensional animal puzzles for the sibling, the sky's the limit! With Cricut Design Space™ and a Cricut Maker™you can make t-shirts with iron-on designs, paper gifts, home decor out of chipboard, create unique jewelry out of leather and aluminum, decorate your home for any event and holiday. Essentially if the project you want to make can be made out of flat materials that fit inside the Maker™, you can Make it!
Bonus Project!
To inspire you here's a quick and easy project I made using a variety of materials and tools with the Maker™.
To make this I used: (**Affiliate links below which pay me for your clicks and purchases) 1 x Piece of White felt (my stash)
1 x **Heavy Chipboard, 11 x 11, 2.0 mm sheet
1 x **Foil Acetate, Metallic Sampler 12 x 12 sheet
String
6 Eyelets
Paint
To make:
1. I chose a simple circle shape in Cricut Design Space™.
2. I then cut 3 circles (one of each material) in different sizes.
3. I painted the chipboard.
4. I made 2 holes in each circle and set eyelets.
5. To complete I attached the three circles with some twine. I also made a tassel from the same twine and attached it to the last circle. To hang this decoration I used another piece of string.
Optional: glue on a bow made from ribbon.
See video here:
Affiliate links below do pay me a small commission if you buy from them, Thx!
Thanks for stopping by!
@officialCricut #CricutMade #Cricut #ad
This is a sponsored conversation written by me on behalf of Cricut . The opinions and text are all mine.
The fifth and final video in the series: Christmas Crafting With Dollar Tree is here!
Make some pretty and sparkly trees for Christmas decorating with Dollar Tree supplies. Make it fast, easy and cheap.
4. Add gems using additional adhesive. Note, if you chose to add some sparkles on top of the glitter that you will have success by using another wet type of glue.
5. Glue to a candle holder.
Easy peasy and cheap! Make a bunch for yourself and to give as gifts. Have fun.
Thanks for stopping by!
** note I was compensated for this post. This post also contains affiliate links and I will be compensated if you make a purchase after clicking on my links.
Save money by purchasing your craft and card making supplies at Dollar Tree ! That's right you can find blank cards, papers, embellishments, adhesives and more at your favourite dollar store, save money and make more cards! Or, buy a box of the ready-made cards like I do, you get so many for so little...and turn these ready-made simple cards into some beautiful with a handmade touch card!
Next using scissors that can cut fine details cut out all the elements you like from a second card.
Select which elements you wish to enhance. Use dimensional foam adhesives to attach said pieces onto another card by layering over the same image or letters.
Another step is to add glitter to specific areas to add some interest.
Thirdly, think about using the design of the card itself to influence how you can add to its appearance. For example, in this situation, I chose to wrap some embroidery thread in and around the letter "O" in the word season before sticking it down with the dimensional foam adhesive.
** note I was compensated for this post. This post also contains affiliate links and I will be compensated if you make a purchase after clicking on my links.
The 3rd project in the series: Christmas Crafting with Dollar Tree is all about making easy and inexpensive wreaths to decorate for the holidays. See how easy it is to make a glamorous looking piece of decor for your home for little money, in no time.
(*Sponsored post with affiliate links)
All the supplies used in making this project were bought at a Dollar Tree and several are available online at Dollar Tree.com.
** note I was compensated for this post. This post also contains affiliate links and I will be compensated if you make a purchase after clicking on my links.
See the Video:
Directions: 1. Fluff the wreath by spreading out the branches
2. Pull the flowers off the stems.
3. Attach the ornament to one of the branches of the wreath, secure with glue
4. Glue the flowers to the wreath
Make several of these wreaths in a variety of colours to decorate your home and also to give as gifts. Find everything you need at Dollar Tree.
Thank you for stopping by. Please leave any comments below.
The third bag was made using materials supplied with the NEW Cricut Easy Press™2. Included was the canvas bag and the Glitter Iron On from Cricut.
Note that each type of iron material requires its own temperature setting on the easy press. Please, take the time to read the suggested heat levels included with each product. Use caution when working with any iron or heat press, and work on a protected heat resistant surface as the heat can melt many surfaces. In the video you can see how a Cricut brand EasyPress mat was used.
Thank you for stopping by. Please, leave any comments in the section below. Stay crafty.
See how easy and inexpensive it is to make Christmas Decorations with supplies bought at Dollar Tree!and other dollar stores! View the second in the series: Christmas Crafting at Dollar Tree.
Check out the wall decoration that was made with a charger plate from the Dollar Tree! Purchase one like this in store or online here at Dollar Tree .com! ** note I was compensated for this post. This post also contains affiliate links and I will be compensated if you make a purchase after clicking on my links.
All the supplies used in the making of this project come from Dollar Tree! Well, with the exception of the glue gun which is from Ad Tech!
To assemble:
1. Glue floral stems to top of charger plate.
2. Add stickers
3. Glue picture hanger to the back
Watch the video!
***Please use caution when using hot glue. Wear protective finger caps if possible. Also, keep a bowl of cool water nearby just in case you need to dip your fingers. It will feel better than the hot glue!
Thank you so very much for checking out this blog post and the video. Please, leave comments in the section below. Have fun crafting!
In no time the Holidays will be here so here's a craft to help you with all that planning, and it's affordable too as you can find all the materials at your Dollar Tree and even online at DollarTree.com.
To make this I used a small binder with a polyvinyl cover measuring 7" x 9".
The inside has dividers made of sheets of poster board in gold, silver, and white, and decorated with a variety of Holiday Themed stickers.
The adhesive and hole puncher is also available at Dollar Tree. The only other item I used is my label maker to make the labels on each divider page.
See the video.
I hope that you are inspired to get crafty for the Holidays, and enjoy all the activities with less stress because you will have a handy-dandy planner to help you!
Stay tuned for more Crafting at the Tree for Christmas here and on my Youtube channel!
In upcoming posts and videos, I will share some decorating and gift giving ideas. All of them affordable, all of them from The Dollar Tree!
Thank you so very much for stopping by, please leave any comments and questions below in the comment section. Bye for now and Stay Crafty!
** I was compensated for tis post. This post also contains affiliate liks and I will be compensated if you make a purchase after clicking on my links.**